Unplugged Activities

Kidbots
What you need
- 2 people
- (Optional) Badges or labels to wear: “Developer” and “Bot”
- An 8x8 grid marked on the ground. This could be:
- Drawn with chalk on concrete big enough for people to stand in each square
- On flooring with a built in grid pattern (such as square tiles)
- Masking tape (painter’s tape) on a suitable surface
- A chess board
- Drawn on a piece of paper
- Something separate to write on (blank paper, a pad, or small whiteboard)
- Something to write with
Skills needed
- Following simple instructions for directions (move forward, left, right)
Activity steps

I’m going to be a Bot (robot), and you can be the Developer who writes programs for me.
If you’ve made badges, you can wear the “Bot” one, and give your helper the “Developer” one.

For me to move on the grid, you can only give me three instructions; forward, left and right. How do you want to write those instructions down?
Decide what symbols you will use to write the instructions (what “programming language” you will use). We suggest arrows (↑, ↰, ↱) or letters such as ‘F’ for ‘forward’, ‘L’ for ‘turn left’.

Here’s how the three commands work.
Practice what each instruction means. ‘Forward’ means step forward into the square directly in front of you. ‘Turn left’ means pivot 90 degrees left on the spot, but stay in the same square. You can demonstrate each of these moves. (Don’t point this out explicitly to the developer, but ‘Turn left’ and ‘Turn right’ keeps you in the same square; it’s more fun if they realise this later!)

This is my starting square, and you need to give me instructions to get to the ball [or whatever object you want to get to].
You can decide on a start and an end position (here the ball is in the end position). The kind of distance shown here (a few squares forward and a few to the right) is good to start with.

Your challenge is to write instructions for me to follow to get to the ball.
The developer writes the instructions (program) for how to get from the start position to the end position i.e move the bot to the ball. They then give the instructions to the bot, who follows them - this is referred to as “running” the program. (Chances are that their first attempt won’t work; the attempt shown here is a typical one with the RRRR causing the Bot to turn on the spot). Do not start moving until all the instructions are written. As a bot, you should always go back to the starting point, and follow the whole “program” each time; ignore any mid-course requests for changes!

(If you don’t get to the correct square) Nice try, but you need to debug your program!
It’s normal for computer programs to need debugging - a bug is simply when it doesn’t do what was wanted. This is a chance to introduce and use the term whenever the program is wrong. Enjoy errors such as sequences of turns that have you spinning on the spot! The developer can mark on the instructions (program) where any bugs (mistakes) are found. Remember, it is good to find mistakes as then you get to debug (fix the mistakes). You could even make up a bug finding celebration dance if you like.

(Once they get the correct answer). Well done, you’ve written a program that gets me to the right place.

Is there another program you could have given the bot to get to the ball? Write the instructions/program for that route.
Follow the new instructions once they are written.

What’s a long set of instructions to get the bot to the ball?
The developer may enjoy having the bot go around in circles, but they have to be careful to get the instructions just right! It’s good to reinforce the idea that there are multiple ways to write a correct program - in fact, the task has an infinite number of correct solutions! It also has an infinite number of incorrect solutions!
Tip: If your child finds it hard to visualise how the arrows work, place the arrows within the grid to show what the bot will do. It’s also a great technique to write the first few instructions of the code, test it and then add to it (consider placing a toy on the grid to remind them where their initial instructions got the bot to). If you are putting arrows on the grid, the turning arrows will also need a forward arrow in the same box, or you can put the forward arrows on the line between boxes, which makes it clearer what it does.
There are many ways to extend this challenge. You can add in obstacles that must be avoided. It is also instructive to reduce the possible instructions to only “Forward” and “Turn left”. With some thought, it’s still possible to get to any position on the grid without the “Turn right” instruction!
Inside the computer
A key point in this activity is that the instructions are all written before they are tested. We don't allow anyone to give additional instructions to the Bot; they must follow exactly what is written (which can sometimes be humorous if they head off in the wrong direction.) This is what happens when programming: you write instructions for a program, and when you run the program, they are all executed without the programmer intervening. A programmer needs to picture in their mind what would happen when they are writing the instructions; during testing they will find out if what they pictured was correct!
Creating a sequence of instructions a computer or robot can follow is an important skill in programming. Like all skills, programming is something you learn through practice, making mistakes, and learning from them. Another important skill that programmers need is to be able to communicate with others, especially when they are working out what the program should do. They also need to be persistent when finding and fixing bugs. Bugs happen all the time in programming, so being able to identify where the bug occurs and problem solving how to fix it is incredibly important. It doesn’t matter how experienced you are at programming, there will always be bugs that need to be found, and fixed. That’s why being prepared, and able, to debug is so important.
Activity found on csunplugged.org
Code a Friend
Definition: Sequence is an order of events
Partners | Materials: None
- One partner is the “coder” and one partner is the “robot”.
- The coder decides on a simple task for their partner “robot” to do; the simpler the task, the better, like “walk across the room.”
- Next, the coder gives their partner “robot” step-by-step instructions, also known as an algorithm, to complete the task. “Robots” need to remember that they can only do exactly what their coder tells them to do.
- If one of the steps is incorrect or not specific enough, this will result in a bug in their algorithm and it will need to be redone.
- Switch places when finished.
Coding Connection: Computers need an explicit sequence of instructions to do anything! As a result, there will be bugs and the program won’t work correctly if instruction (code) is not clear enough.
Activity from Kodable.com
Treasure Obstacle Course
Definition: Sequence is an order of events.
Pairs or Group | Materials: Treasure, paper and pencil
- One person hides a piece of “treasure” (this could be anything!) in an indoor or outdoor space.
- Next, the treasure hider writes out instructions explaining how to find the hidden object. The instructions need to be very clear so the finder knows exactly what to do – otherwise, they won’t get to the treasure! Example:
- Take 10 steps STRAIGHT
- Turn RIGHT and take 5 big hops
- Turn LEFT and crawl 8 times
- Dig 2 inches down to find the treasure!
- Once the instructions are written, the finder follows them exactly.
- If instructions aren’t clear enough, the hider may need to find the bug and fix it so the finder can successfully reach the treasure.
- Switch places when finished.
Coding Connection: The treasure finder needs very clear instructions for how to find the treasure, just like computers need very clear and concrete algorithms to execute their tasks.
Activity found on Kodable.com
If/Then Follow the Leader
Pairs or Group | Materials: None
- One partner is the leader and one is the follower.
- The leader starts by giving simple instructions in the format of an If…Then…statement. For example: “If I touch my nose, then you touch your nose” or “If I jump once, then you jump once” etc. Try out a few actions.
- To increase difficulty, the leader can specify outcomes that are different than the condition. For example: “If I jump once, then you jump three times” or “If I spin in a circle, then you clap your hands”.
- Once the pair has come up with a few actions, the leader can perform them at random! See if the follower can keep up, without forgetting what action to perform with each direction from the leader.
- Switch roles when finished.
Coding Connection: A new condition from the leader can change the action performed by the follower, just like a condition in code can change the path a computer program takes.
Activity from Kodable.comA Loopy Routine
Definition: A loop is a command that repeats a part of code a certain number of times.
Individual, Pairs, or Groups | Materials: Paper and pencil (optional)
- The learner decides if they want to create a fun workout routine or a dance routine.
- Come up with three physical actions to perform. For a workout routine, this could be a jumping jack, pushup, and sit-up. For a dance routine, this could be a spin, clap, and wiggle.
- Decide how many times each action should be repeated, or “looped”. For example, “spin 2 times, clap 5 times, wiggle one time”.
- Perform the routine all together, looping each action the designated number of times. Then, try looping the entire routine at least twice!
- As an extension, invite a partner to execute the same commands and perform the routine together!
Coding Connection: A loop can be used to repeat a physical action, just like a loop in coding will repeat a portion of code a certain number of times.
Activity from Kodable.com
Nature Scavenger Hunt
- Head outside into nature.
- First, pick a specific property by which you want to categorize nature objects. Examples include color, shape, texture, smell, etc.
- Then, choose a value that you will search for. For example, if the property is “color”, then the value could be “yellow” or “purple“.
- Collect nature objects based the property and value selected
- When finished, challenge a partner or family member to guess the property value you identified. Did they guess right?
- As an extension, try instead to collect a wide range of nature objects. Bring them back to a work space, and categorize them by different properties. For example, first sort by color, then sort by shape, and by texture. How many categories can you identify?
Coding Connection: In code, properties can determine the output of a program, or what a user sees. Similarly, an objects’ properties in the real world can impact how we see and compare them.
Activity from Kodable.com
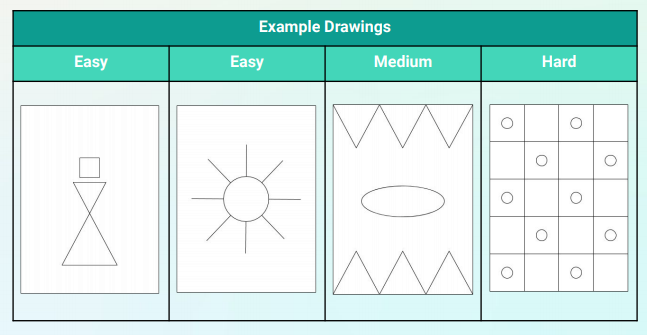
Algorithm Dance Party
Algorithm Artist
- Another player. You need at least two people, but this game works for a big group as
well. This game doesn’t require you to be physically next to the people you are playing
with, so you can play it with friends or family on your next virtual hangout! - Algorithmic Artist Game Planning Guide
- Paper
- Pen or pencil and/or markers
which level or levels you want to play: easy, medium, or hard (we recommend a few of each).
Next, use the Algorithmic Artist Planning Guide to help you generate your drawings.
Depending on how long you want to play, each player can make 3-4 drawings.
Decide who will be the first instructor. If you are in the same room, make sure the artist(s)
cannot see the drawings. The instructor should have their drawings and the artist(s) should
have blank paper and a pen, pencil, or marker.
- The instructor chooses a drawing and tells the artist(s) how to draw it.
- The artist is not allowed to see the drawing.
- The instructor may use words that include basic shapes and locations to instruct the
artist(s) how to draw the picture.
Ex: Draw a circle in the middle of the page, then draw two lines on opposite ends of the
circle starting at the edge of the circle. Draw a total of 3 sets of opposite lines from the
circle. - The artist(s) are not allowed to speak or ask questions while the instructor is talking.
- When all the artist(s) are finished, artists will reveal what they drew, then the instructor
will reveal the original drawing.
Squeezing Pictures into Codes
What you need
- A pencil (ideally 2B or heavier), or a dark pen, felt-tip marker or dark crayon. A pencil is easier in case you want to erase mistakes.
- Paper with a grid on it - squares should be about 2mm to 5mm (about 1/8 to 1/4 inches); the grid squares should be easy to color in for the type of pencil or pen you are using. A grid of 20 by 20 squares will be enough for the examples below; a larger one will be needed for the challenges. Options include:
- Printing from the PDF pages here
- Large grid
- Small grids (6 on one page) - these require more precision
- Use “quad paper” or “graph paper”
- Draw your own grid using a ruler and pencil
- Printing from the PDF pages here
- Print or write out the codes for “Picture 1” from this page
- Optional: Try writing out the codes for Pictures 2-4 (here)
Skills needed
- Reading numbers and counting up to about 20, coloring grid squares
Activity steps

These numbers are a code for a picture; you can use them to draw the picture on this grid. Each square on the grid is one pixel. Some pixels will stay white, and some you’ll need to colour in black.
Show numbers for “Picture 1” and empty grid.

We start on the first line of squares. The 2 means it starts with 2 white pixels, and the 7 means to colour in 7 black pixels, so let’s colour those in.
Check that child skips two squares and starts coloring in the third one. They may want to count the black pixels, mark the last one, then color a line for the row of black pixels.

The completed first row has 2 white pixels followed by 7 black pixels.

If it gets confusing to follow the alternating white and black lengths, you could highlight the numbers corresponding to the runs of black pixels (every second number).

The next row is the same, so we have 2 white, then 7 black pixels.

The third row is more complicated. The numbers always tell you how many white, then black, then white pixels there are, and so on. How many white pixels does it start with? (2) Then what does the 1 mean? (1 black pixel).
The idea that the numbers are alternating runs of white then black pixels is important. You will need to help count carefully, as getting out by one can completely change the picture! Work through the whole row (2, 1, 1, 3, 1, 1, 1, 1).

The next row starts with a 0 - what does that mean? (No white pixels at the start, so it has 11 black pixels only). Why not just have the number 11 without the 0? (Because that would mean 11 white pixels).
Check that for "0, 11" they color in the first 11 pixels.

This one also starts with a 0, so what colour is the first pixel? (Black).

What’s on the next row?

And the final row?
Depending on the size of the grid, you may want to stand some distance away to see the image clearly.
After completing Picture 1, you could try Pictures 2 to 4. The codes are here.
As a follow-on activity, you could use some blank grid paper to draw your own picture, and code it using numbers to give to someone else to decode.
Inside the computer
The small squares that you are using are the basis of most digital pictures - they are called “picture elements”, or “pixels” for short. A good quality photo or video can have millions of pixels in it; a million pixels is called a “megapixel”, and often the number of megapixels is used to indicate the quality of a camera.
The idea of coding a run of the same color with a number is called “run-length” coding. It can significantly reduce the amount of space needed to store the image on a computer, or the time needed to send it over a network. Run-length coding works particularly well for simple pictures that have only a few colors in them. It is the basis of sending black and white scans on fax machines, and in more recent times, variations of this idea are used in JPG files of photographs to save space. Run-length coding meant that fax transmissions would typically transmit 7 times faster than if every pixel was sent separately, because long runs of the same color are common in high resolution scans. The general idea of looking for patterns in a file and replacing them with smaller codes is called data compression, and this is used to reduce the space that files take to store (such as photos and music on a mobile phone), and to make them faster to transmit (such as digital TV and online videos).
Activity from csunplugged.org
Guess My Number
This is similar to the game of 20 questions, but it is about guessing a number with the strict rule that you can only answer whether the secret number is greater than or equal to a guessed number.
What you need
- At least 2 people
- A pen or pencil
- Two or three pieces of paper
Skills needed
- Comparing numbers up to 100
Activity steps

I’ve written a secret number on this paper, and you need to work out what it is. It’s between 1 and 100. Each time you tell me a number, I’ll tell you if my number is greater than or equal to your one. I won’t tell you if it’s equal - but you’ll still be able to work out my number!
Write a number on some paper, and fold it over so it can’t be seen. It can be any number from 1 to 100; in the example below the parent happens to have chosen 52 as the secret number.

What number do you want to guess first?
Write a "greater than or equals" symbol followed by their guess. (In the example, the child has guessed 50.)

(Depending on the number)
My secret number is not greater than or equal to your guess.
or
My secret number is greater than or equal to your guess.
Write a tick or cross depending on whether it is greater than or equal. Since 52 (the secret number) is greater than or equal to the guess (50), the presenter has written across.
Do not tell them if they have guessed your number! They will need to work out when they have enough information to know the number, so this is different from traditional versions of games like "20 guesses". The best guessing strategy is to start by guessing 50 (which the child happened to do in this case), but it’s fine if the child wants to use another approach - let them work it out for themselves!

Which number do you want to guess next? Again, say one of these:
My secret number is not greater than or equal to your guess.
or
My secret number is greater than or equal to your guess.
In this case the child has guessed 75. The secret number isn’t greater than equal to 75, so the presenter has marked it with a cross.

This repeats until the child can guess the number.

In the example, the child happens to have named the secret number (52), but the presenter has only said that their guess is greater than or equal to the secret number.

As it happens, the child can deduce that the number must be 52 from the information available, since they found out earlier that it’s not greater than or equal to 53. It can take a bit of logic to work this out, but it’s always possible to narrow in on the number.
You can play this game a few times so that they can refine their strategy and develop their logical thinking to find the answer. After a while they may discover that it’s strategic to keep dividing the range in half.
Inside the computer
This activity touches on several key ideas in computing. One is that dividing big problems in half, then half again, and so on, makes them very small very quickly. With 100 possible values, only 7 questions are ever needed to narrow down to the secret value if you use the right strategy.
Activity from csunplugged.org